Oscar's Chair is a 4-kilobyte demo that I released at Revision 2018, and which received 1st place in the competition out of 18 entries. I created all the visuals and animation, noby created the music using 4klang. Comments about it can be found on Pouet here and a YouTube video capture can be found here. In this article I will go through the story of it's creation and some of the technical details of how it works.
Conception
For some weeks I had been trying to come up with a good concept for my Revision entry, going back and forth between ideas. I kept thinking that I would do well to go back and re-use the small voxel-based global ilumination lighting system I had created for Horizon Machine the previous year. I knew from early experiments with that system that it's full potential hadn't been realised yet and there were many types of scene that it would do a good job of rendering (I really need to write an article about it at some point...). On the other hand, the global illumination took up a large portion of the executable size and I was hoping to have more of a 'story' this time around. In addition to this I wanted the next demo to have more detailed surface texturing because I felt that Horizon Machine was lacking this in it's rendering. I had a vague notion of an indoor scene, a bare concrete room with various furniture lying around. I imagined that there would be some kind of 'lifeform' embedded in the furniture in this abandoned house which begins to show itself and to distort the reality around it. I couldn't really put my finger on what the overall story should be, but I really wanted something with a feeling of abstract psychological horror.
The first idea that I settled on really crystalised within one short period of time - I was taking a shower (so it was destined to be a great idea really) while making an extended stay at noby's place and I decided that if I had some abstract cacophanous music I could use that to imply that there was something special or supernatural about this one piece of furniture. I decided that this one item of furniture would be a chair, because it often happens that chairs are closely associated with individual persons (consider a throne, or the barstool of an old pub regular). In the end I would opt for a less abstract concept but the idea of implying a presence would stay. By the time I had finished showering I already had a plan laid out in my mind - the chair would be introduced, it would be shown to have some supernatural quality and then there would be a climax of 'madness'. I almost immediately relayed this all to noby and his response, after a short pause, was "...and you've seriously never watched anything by David Lynch?". I hadn't, but I loved the implication that I had come up with something good. He showed me this one scene from Twin Peaks, which my concept had reminded him of. It had pretty much the feeling that i wanted, but I explained that I had a specific piece of music in mind to drive the demo along - Gwarek 2 by Aphex Twin. I played it for him and excitedly asked if he would be able to reproduce those sounds in 4klang. Of course, he could.
After that I decided that I could relax a bit because I had found a concept that I liked and that I was sure I could pull off in 4 kilobytes. Some time later, after I had returned to Germany, we started to get to work on it. We decided that the best way would be for noby to create a variety of clangs (hey, the synth is called 4-klang, right?), metal scrapes and weird 'howling' noises for me to combine in a way that fits the visuals I'm trying to go for. In the meantime I would actually begin writing the code to produce a chair and the room it would exist in.
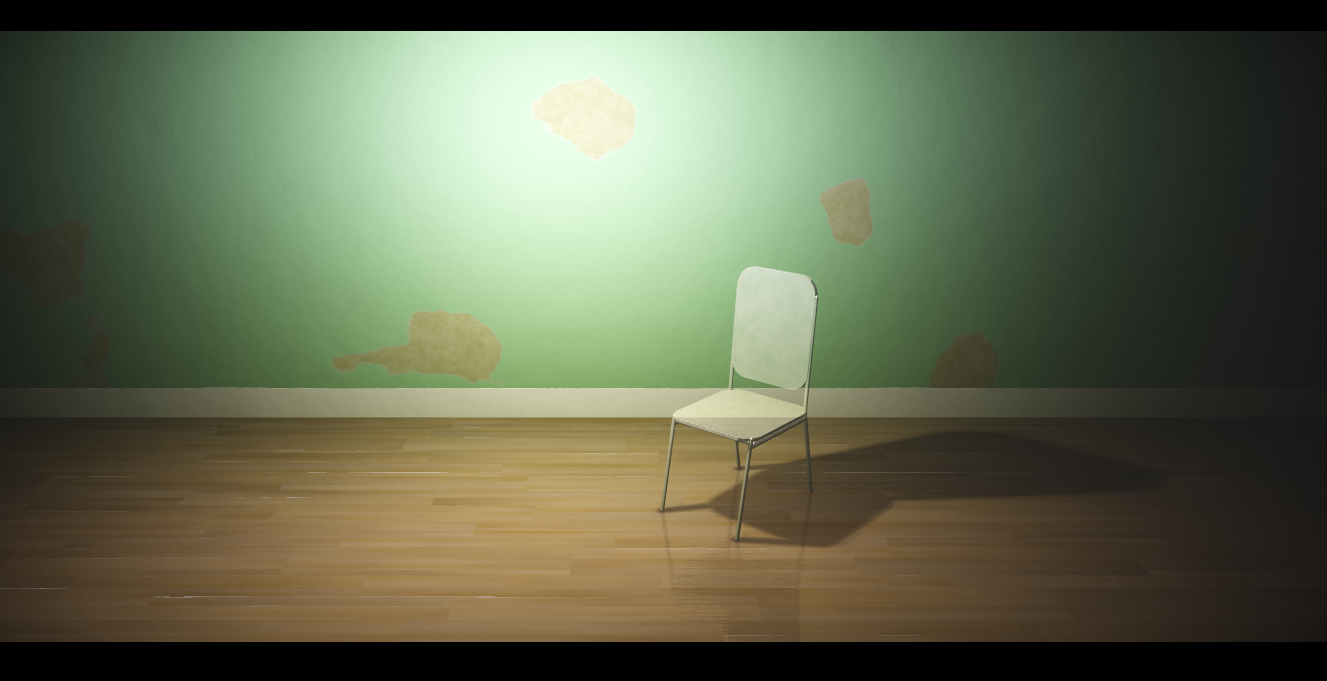
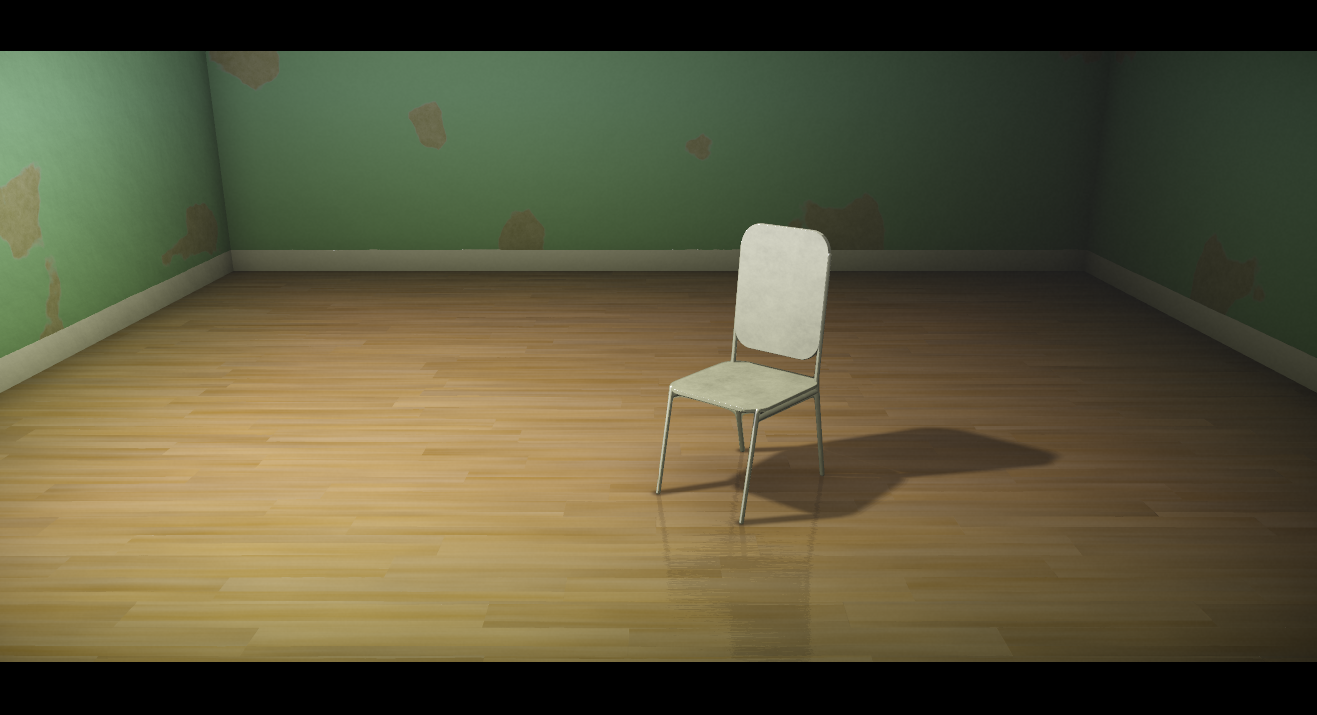
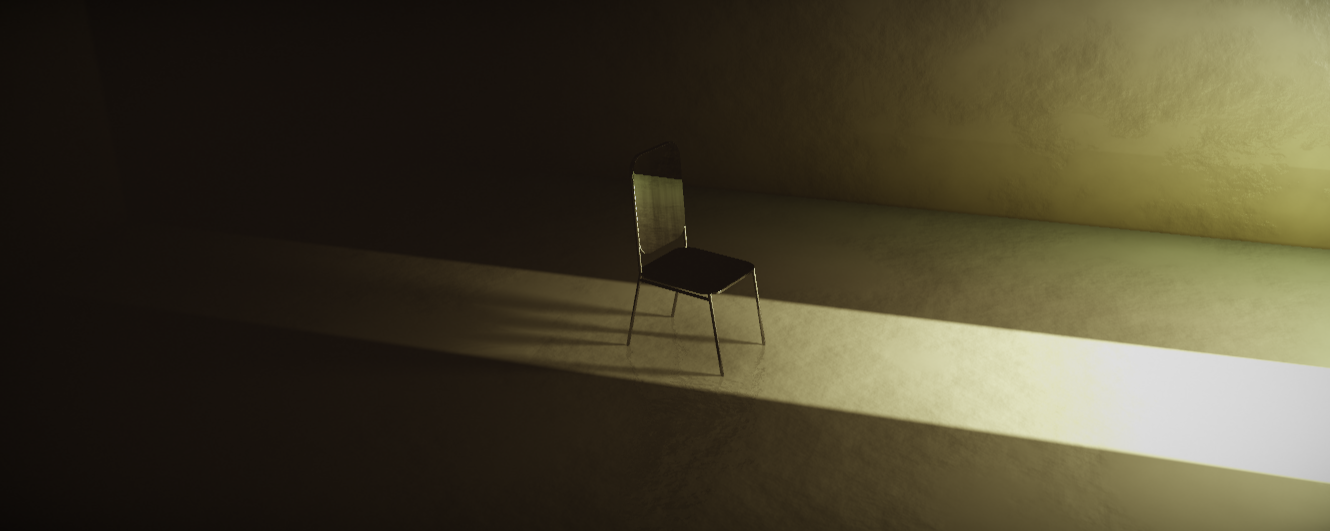
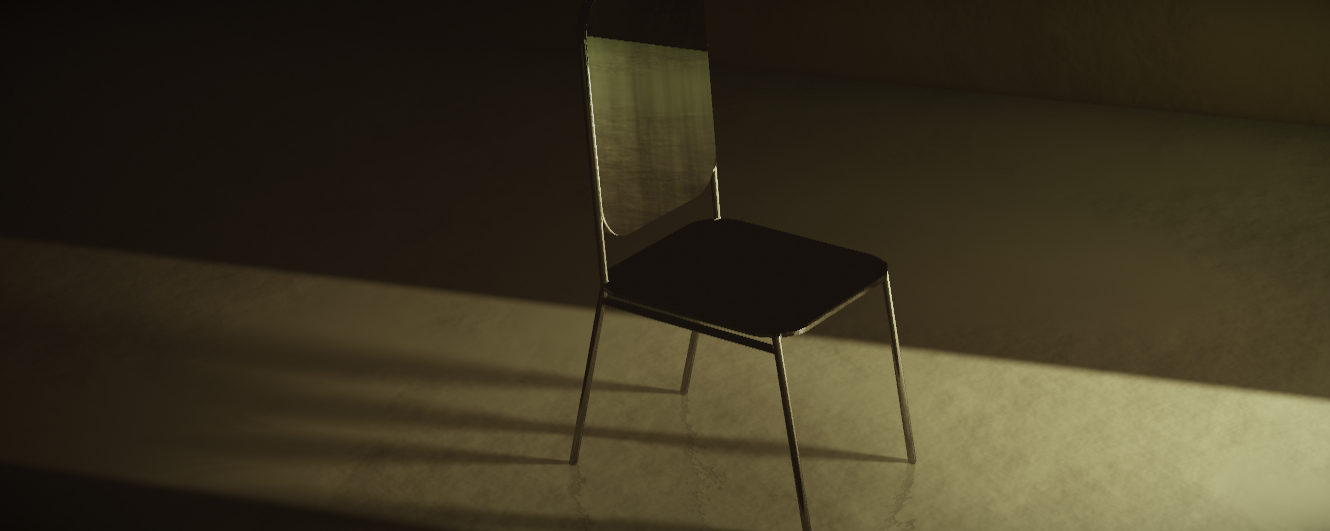
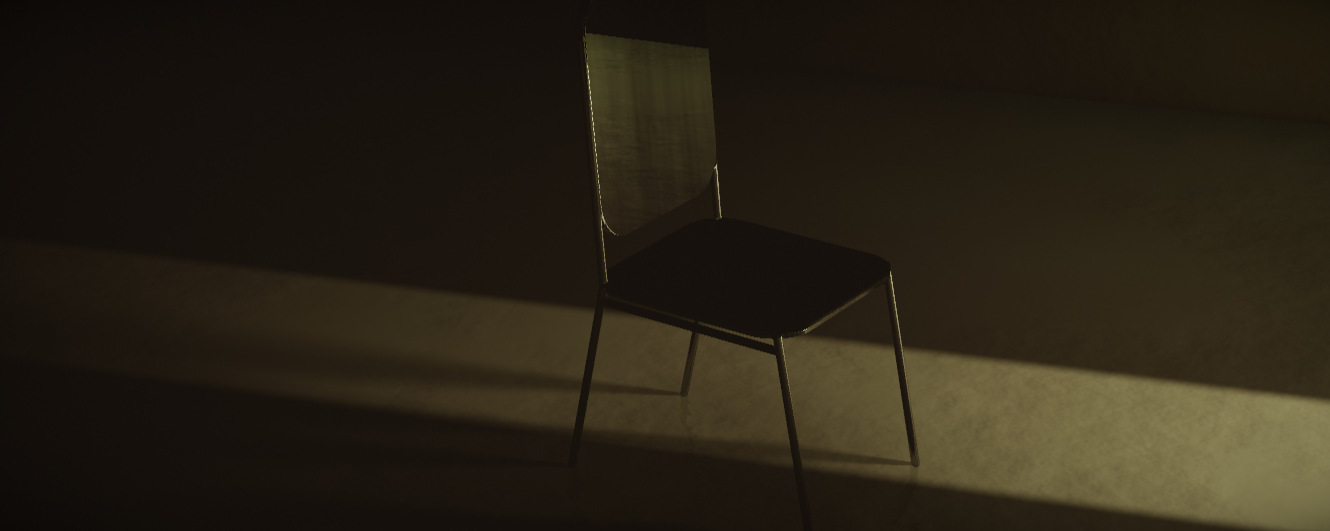
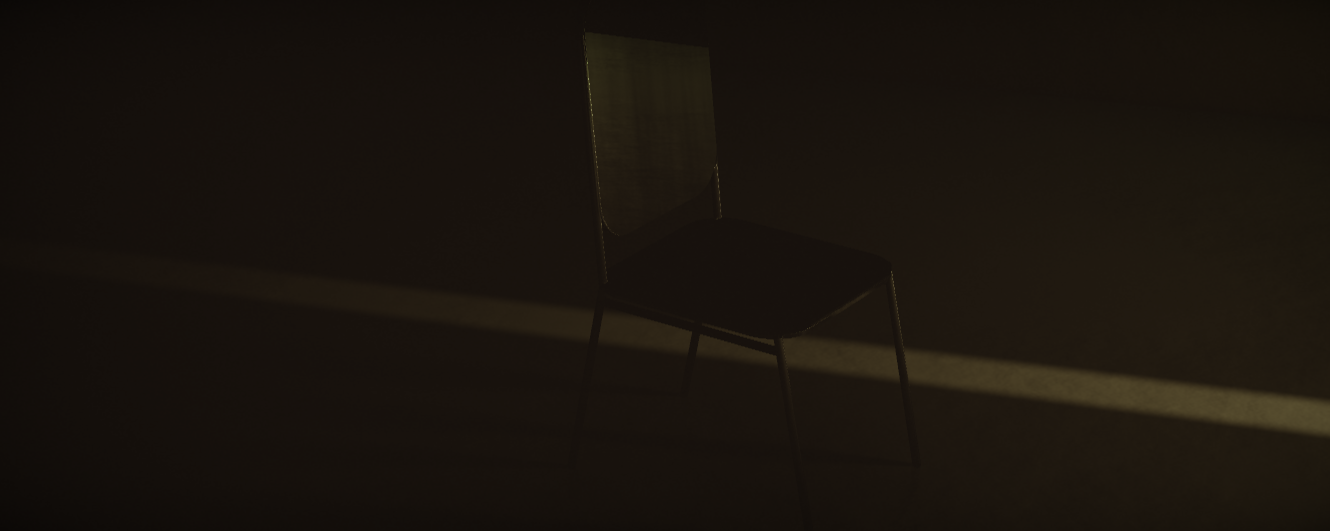
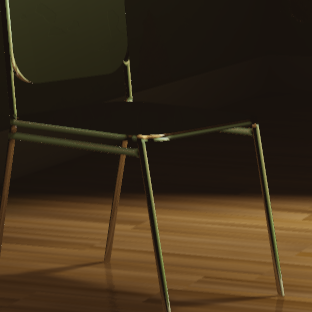
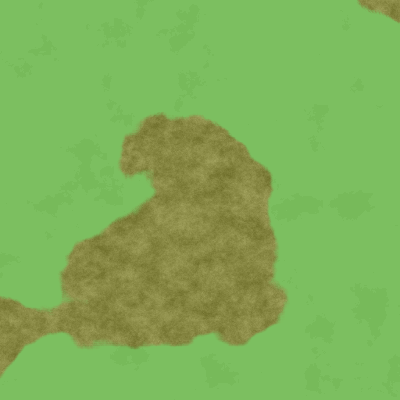
Here are some shots of how the chair and the room looked in the earliest stages of the demo's creation. It started out looking very flat but once I had gotten something with more depth and detail, and which had a dark tone, the look stayed pretty much the same until release.
Some of the first screenshots taken during development.
Before long I had something resembling my original vision for a 'room of madness' consisting of a harsh red strobing light which would create a dark silhouette of the chair. Behind this I put the word "Oscar" scrawled in black. This was the name I had chosen for the unseen entity inhabiting this outwardly inanimate object. I chose it because it sounds old-fashioned and perhaps ghostly. I figured I could take advantage of the fact that the word would be stored in a texture (as described later in this article) and just sample it with distorted UVs to get a scrawled look. This kinda worked, but in the end result looked way too much like a captcha image for my liking.
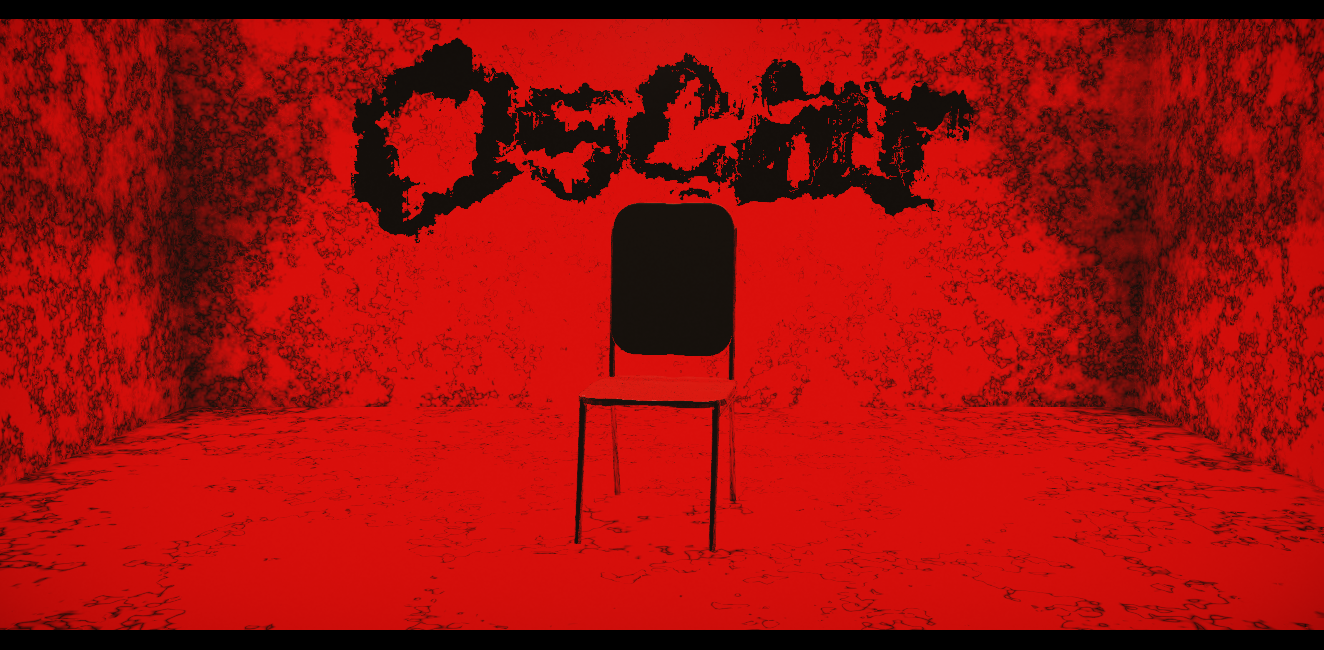
Are you a bot? Please type the word shown in this image before sitting on this chair.
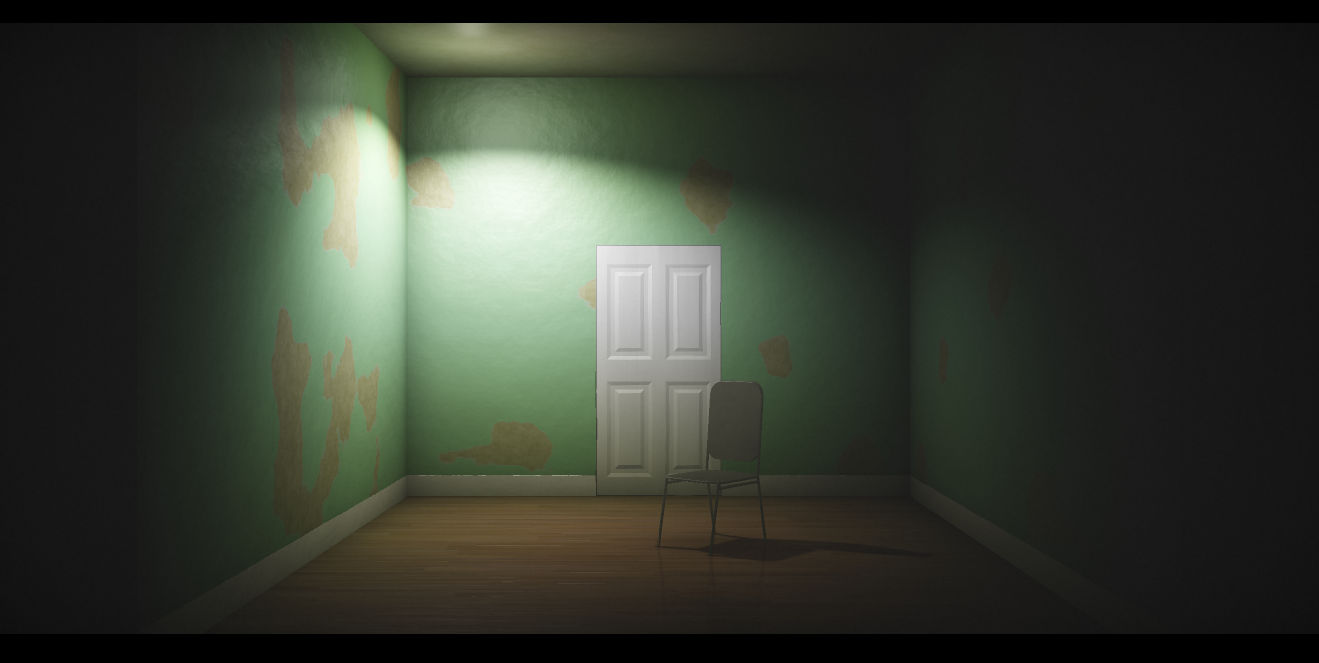
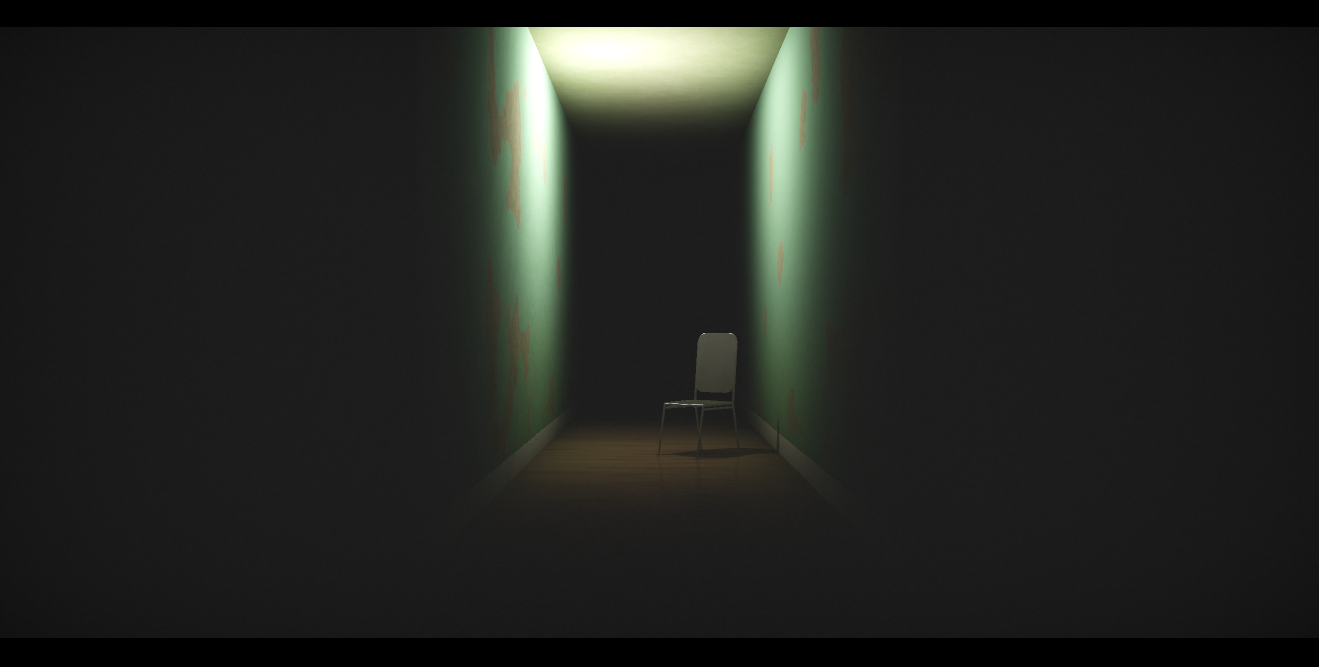
In any case at this point I was stuck on getting this idea to work so I left it like that and moved on to solving other parts of the demo's storytelling. The building madness had to have a premonition or foreshadowing of some kind, and I decided I would try to set the whole thing up such that the viewer has the feeling of becoming trapped in the room with the chair. I wanted to have a door slam shut to cloak the room in darkness before the red strobe light fires up along with a crescendo in the music. This would be helped along by one of the metal scrape sounds that I handily had - it would be the sound of a heavy door screeching along the floor and slamming shut. Furthermore I didn't really need to render a door, I could simply suggest it with a thinning shaft of light. The short sequence looked like this:
The unused door closing sequence.
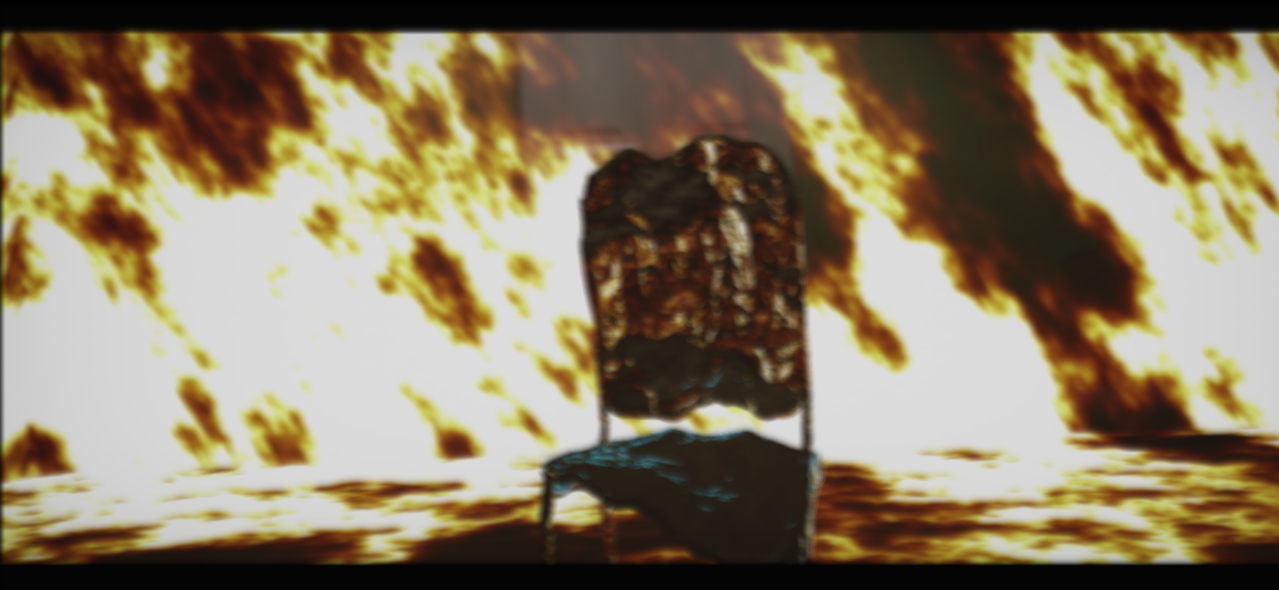
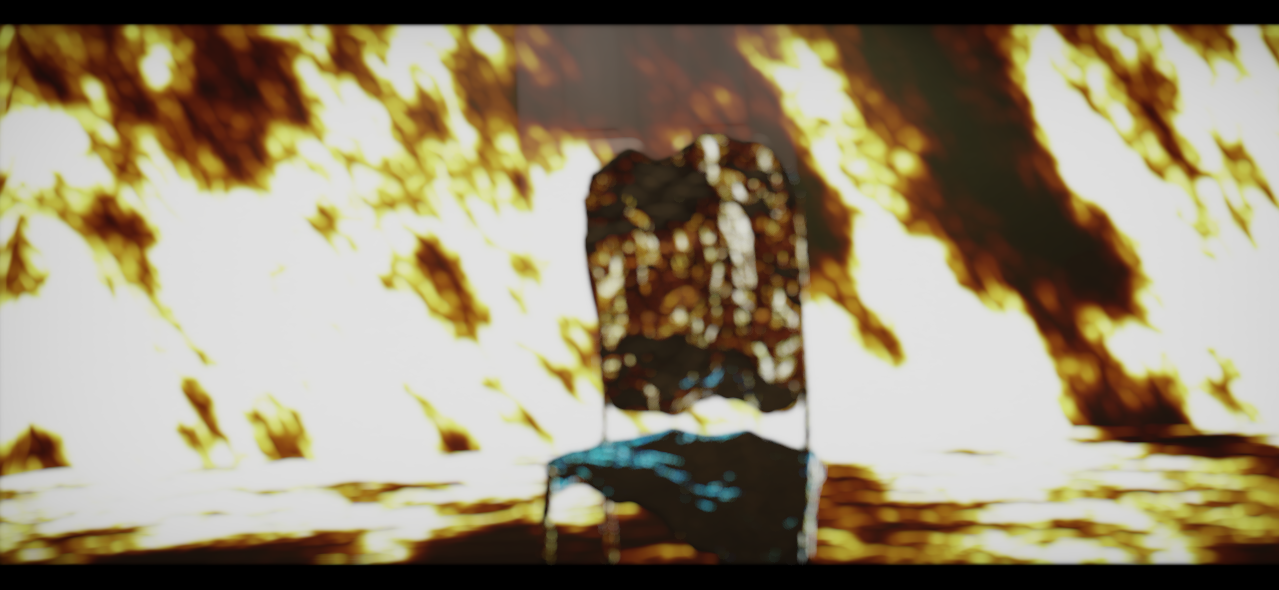
At around this point I started to realise that I was being a bit too ambitious. I started already doing compressed executable builds with the basic music I had put together and it was quite far over the limit, some 400 or so bytes over. Having done a few 4-kilobyte demos before, I've gained a sort of 'sense' for how likely the target size will be reached given certain content and the remaining time left until deadline. I knew I'd need to cut back somehow, and I knew that this would mean dropping some important part of the story - either the scrawled text, the door-closing scene, or something else. I had to communicate the story in a simpler way, and I couldn't figure out a way to do that without making it too inaccessible to the audience. On top of that, I really began to feel that the idea was too strange for the typical large Revision audience and that it didn't provide enough of a climax. So I went and changed the story to something more approachable and more grounded in reality, which only required surface effects. The flashing red room became a fire effect made of scrolling noise textures, and the rationalisation for this fire became a murder scene. Essentially, the murderer is destroying evidence and Oscar is the guy who got killed (or something along those lines anyway). The crime itself was communicated with a very simple pool of blood on the floor next to the chair. The melting effect of the chair had already been added by this point - it was originally more like a 'demonification' of the chair which I had found via experimentation with adding noise to the SDF sampling position. With some tuning of the parameters it became a slow disfiguration as if melting under intense heat, and all the pieces were set to fall in to place.
Once I had reached the point were the shading, story, and executable size were approaching release-worthy states I turned my attention to the music, which up until this point had remained as a very poor-sounding collection of noises forming a vague sketch of how I wanted the music to progress. After some playing around it dawned on me that I just don't have the ability to make it sound as good as I wanted, so I rushed back to noby and practically begged him to make it for me, discarding what I had made up to that point. The biggest thing in my mind that we needed to achieve was a dramatic crescendo at the point where the fire is in full effect and the chair melts, which cuts dead to an eerie shot of the burning room from outside (I had wanted to show this outer area completely burnt-out as it logically should be, but I simply ran out of space and time). In my mind I had something akin to the sound of rising strings as is often heard in movie soundtracks. String instruments in 4klang are totally possible, but the problem was that 4klang doesn't easily allow pitch-bending. Fortunately noby solved it in a fantastic way - by seamlessly crossfading notes. The result is very convincing. I just kinda wanted him to 'make it sound good', and he totally delivered (on time!).
With the visual and musical design elements generally converged to their final forms, the usual week or so of crunching down the executable size followed. I got it all under the 4-kilobyte limit about a day before I left for Revision, which is what I try to aim for these days since I find partycoding to be a horrible experience. All in all, the project ran very smoothly thanks to the fact that I started on it quite early - it was around 2 months of time from starting work to release.
Typography
One of the disappointing aspects of Horizon Machine was the text displayed at the very end of the demo. It's aliased, it's a badly-chosen font and it's not arranged in a nice or interesting way - it was really cool that we got some text in there, but it was certainly an afterthought. So this time I set out to have text as a 'first-class feature' of the demo, which would appear in the introduction and be rendered nicely and have an appropriate look (Windows pre-installed fonts permitting).
I found this one weird trick for rendering text in OpenGL with a minimum of code in an ancient NeHe tutorial during the production of Horizon Machine. It requires the creation of a Windows font handle, which in Oscar's Chair is done by calling CreateFont which takes arguments describing the desired font (for those interested, the font used in this demo is DejaVu Serif). Then SelectObject is used to select the font handle. Then a very cool function called wglUseFontBitmaps is called. This function creates a set of OpenGL display lists (again, an ancient feature of OpenGL) - one for each character in an ASCII set. Handily, this means that glCallLists, which takes an array of display list indices, can take an ASCII string directly and interpret each character code as an index in to that set of display lists, each individual list of course being the polygons that make up a single character's image. This is really cool, because with only 4 short function calls you can be using the GPU to draw text directly in to your framebuffer. The only catch is that the location of the text is determined by the current raster pos, but in this case that wasn't a problem at all.
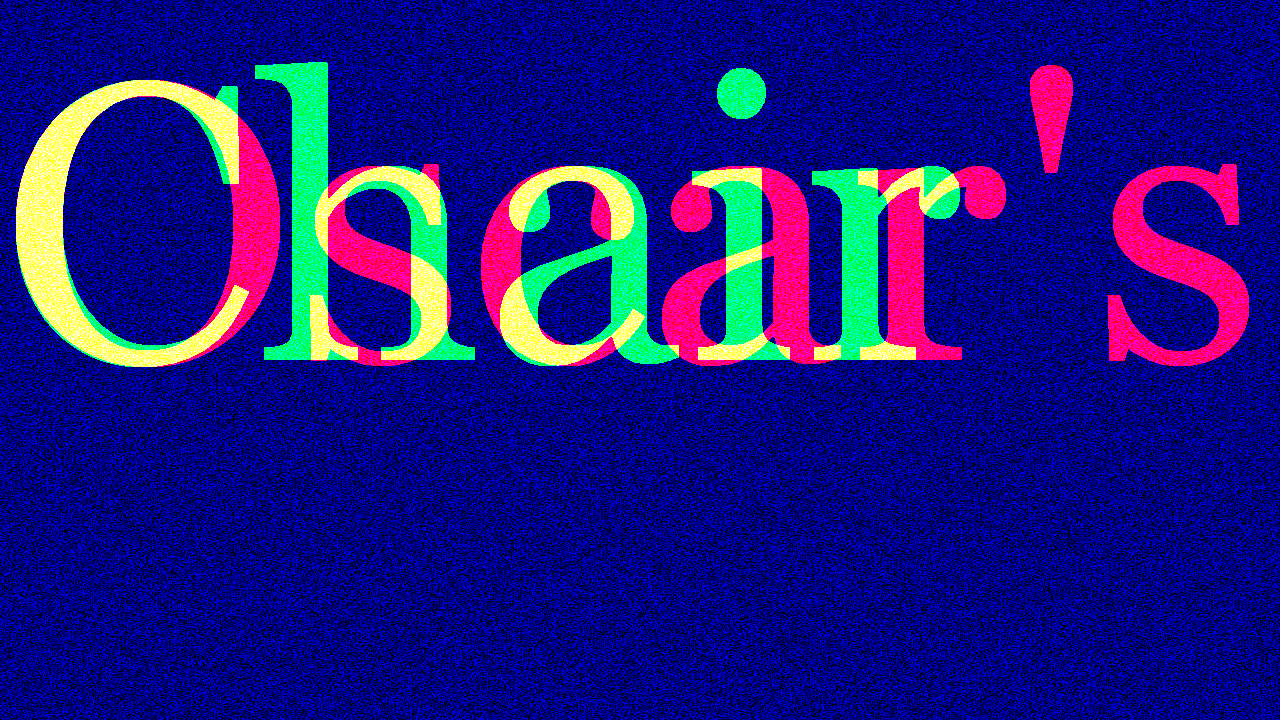
This time I wanted to do the text positioning in a shader and in fact this was necessary if I wanted anti-aliasing on the text, since this method of drawing the text doesn't permit any kind of hardware anti-aliasing (as far as I could determine anyway). It just so happened that I wanted to use a framebuffer-sized texture anyway to store the random numbers for my procedural noises which would achieve the 'high-detail texturing' objective of this demo. To get the maximum resolution possible on the text (to allow the best brute-force anti-aliasing result in the shader) I had each word in "Oscar's Chair" be drawn in to separate channels so they were allowed to overlap. So in the end I had "Oscar's" in the red channel, "Chair" in the green channel, and the pre-generated random numbers in the blue channel. Population of the texture was done with one call to the ancient function glCopyTexImage2D.
The combined title text pieces and generated random numbers stored in memory, and the anti-aliased and arranged text written out by the shader.
By the way, the whole demo uses only one fragment shader and this shader is created using only one OpenGL function - glCreateShaderProgramv. This function is a relatively new addition to OpenGL and it is extremely useful when trying to make small code. Before this function was added to drivers it was necessary to call glCreateProgram, glCreateShader, glShaderSource, glCompileShader, glAttachShader, and glLinkProgram. Phew...
Render Loop
This process of rendering the pieces of text and random numbers in to a texture was originally done as an initialising pre-step before the main rendering loop. But when I decided to (or rather, realised that I needed to) add a depth-of-field effect it became necessary to store the rendered result so that it can be sampled and blurred by the singular shader program. To save the bytes that would be needed to make more texture creation and binding calls, I simply re-used the same texture handle and performed the initialisation again at the start of every frame. That might seem like a waste of precious frametime, but it was fast enough that the tradeoff was definitely worthwhile in terms of compiled code compression. After this initialisation of the texture with the title text and random numbers is an inner loop with two iterations, one for each of the two 'modes' that the shader has. The first iteration performs the main rendering task of drawing the chair, the walls, the fire, the title text and all shading. The second iteration applies the depth-of-field effect. The inner loop is very simple, consisting of glCopyTexImage2D to copy the current framebuffer contents (title text and random numbers in the first iteration, pre-final render in the second iteration), glTexCoord1i to pass in the time counter, and glRects to invoke the fragment shader. glFinish is called after all of this to avoid command buffering or tearing problems.
Geometry
The surface geometry is very basic. The surrounding room is a single cuboid, which has a size which varies throughout the demo. It is analytically raytraced, and all geometric detail is added by bump-mapped procedural textures which are described below. The chair itself is a relatively simple signed distance field:
float dist(vec3 p)
{
float b=time>81?-1.4:-2.827;
p-=chairpos;
p.y+=(fbm2(p.xz*=mat2(cos(b),sin(b),-sin(b),cos(b)),2.5)/2+.5)*clamp(time/3-29,0,5)+bs.y-1.25;
p.x+=fbm2(p.yz,2.5)*clamp(time/3-29,0,5)-max(0,p.y)/10;
p.z=abs(p.z);
return min(min(min(max(length(max(abs(p.xz)-vec2(.45,.41),0))-.25,abs(p.y)-.02),
length(p-vec3(clamp(p.x,-.6,.6),-.1,.6))-.025),
length(vec3(abs(p.x)-.6+min(0,p.y)/5,p.y-clamp(p.y,-1.24,1.5*step(0,p.x)),p.z-.6))-.025),
max(length(max(abs(p.yz-vec2(1,0))-vec2(.5,.35),0))-.25,abs(p.x-.6)-.03));
}
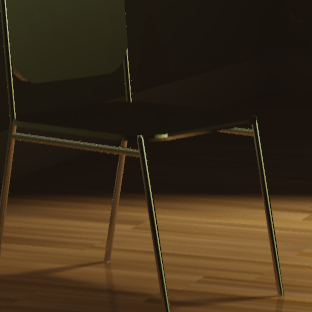
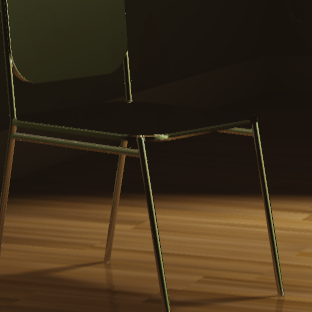
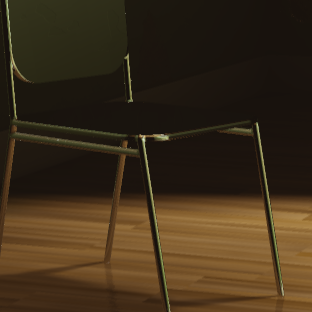
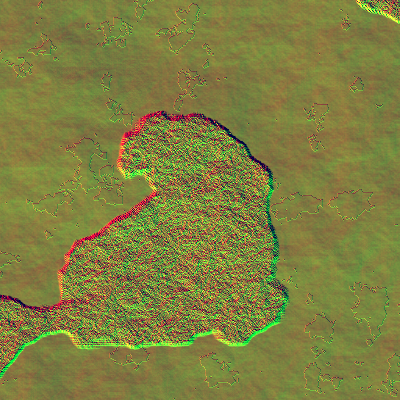
To make the chair look a little bit less artificial, the normal vector extraction (which uses central differencing) uses a rather large value for it's sampling offsets. Shown below is the effect of varying this offset. A larger offset gives the appearance of the parts of the chair melting or fusing together, as metal components often are. It also gives the handy effect of adding a bevel to the hard edges of the chair, which are also important for believability. This is just a shading trick, the geometry is not smoothened at all (it would cost extra shader code bytes and extra per-raymarch-step computation to achieve that anyway).
Here the epsilon value for central-differences when computing a surface normal is increased, from left to right.
Surface Texturing And Shading
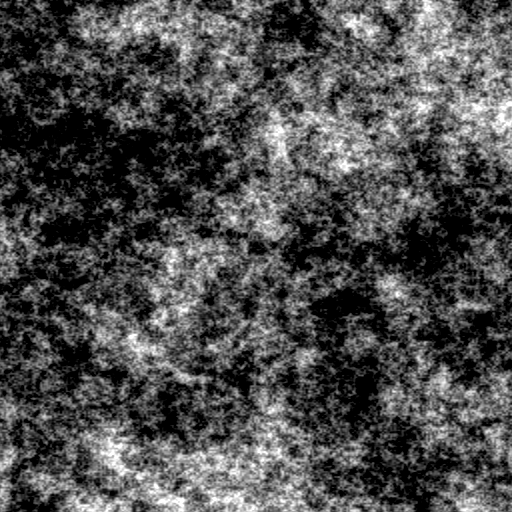
The high-detail texturing that I so desired was achieved via a single FBM function with a parameter for varying the spectral content of it's output. This is not very exciting, but it turned out to be the most important function in the whole demo, so here it is.
float fbm2(vec2 p,float f)
{
float x=0,s=1,a=1;
for(int i=0;i<noiseoctaves;++i)
{
x+=(texture(tex1,(p+i*40)*s/vec2(1280,640)).b*2-1)*(a/=f);
s*=2;
}
return x;
}
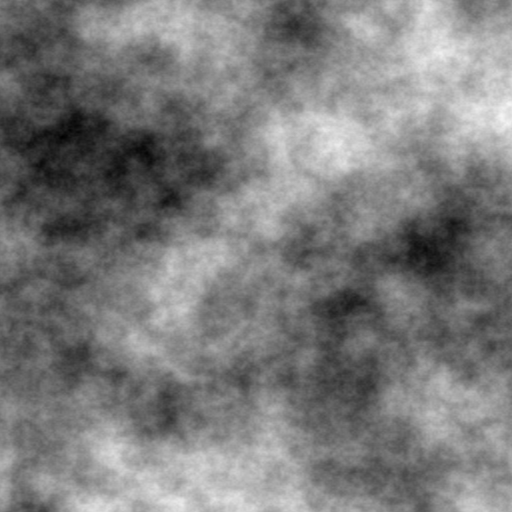
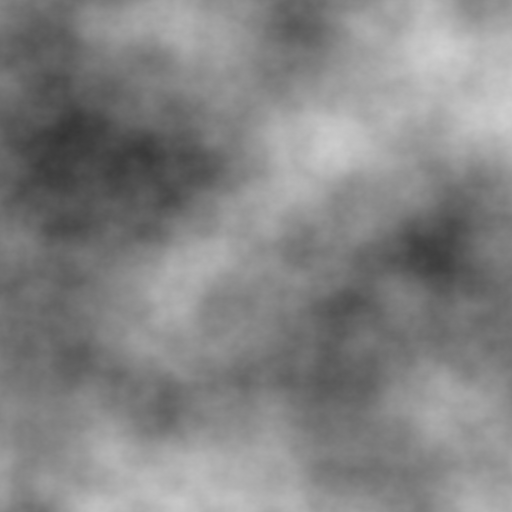
Here the f parameter was set to 0.5, 1.0, 1.5, and 4.0 from left to right.
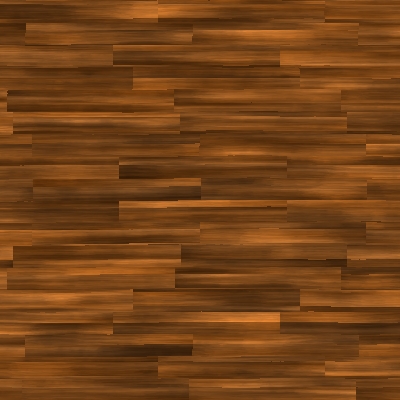
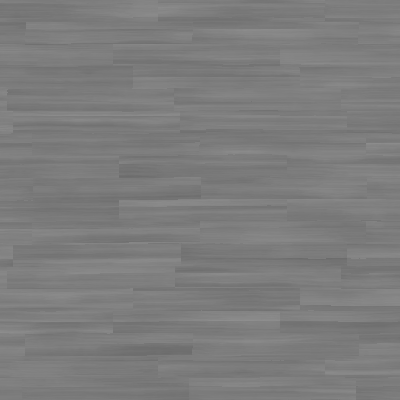
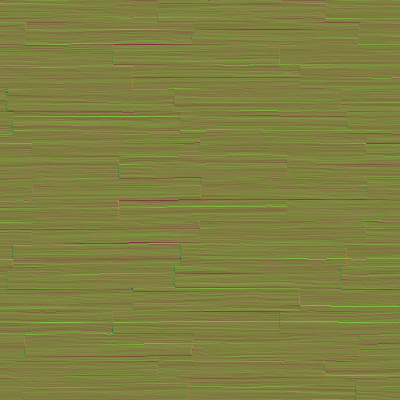
This function was used for the wooden floor, the flaking walls and the small variations of their exposed plaster, and for the fire itself. It was also used for deforming the chair SDF to make it appear to melt. Overall this function was used twenty-two times in the shader sourcecode. So it turned out to be pretty important for the demo. The flexibility of the function was useful for getting a range of different looks.
Colour, height, and resulting normal maps of the noise-based textures.
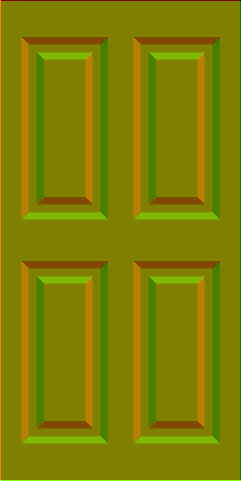
The one texture that makes almost no use of this noise function at all is that of the door. It's very regular. So regular in fact that it misses out one rather important aspect of any door: it has no handle.
c=vec3(fbm2(p*vec2(1,.2),2)+2)/4;
p=abs(p+fbm2(p,2)/60-vec2(0,3));
if(p.x>1.475||p.y>2.975)c*=.3;
return 11-clamp(abs(max(abs(p.x-.7)+.3,abs(p.y-1.4)-.3)-.7),.05,.14)*11+fbm2(p*vec2(1,.2),2.5);
The very simple door texture. Height on the left, derived normal on the right.
The fact that the base noise was read from a stored texture meant that it was fast enough that I could afford to have many many octaves of FBM. However, all that high-frequency content needs to be filtered by pixel footprint somehow. Well it just so happened that my scene was so fast to render thanks to it having just a few SDF primitives (which in the end only needed a maximum of 30 raymarching steps) and having an analytically-intersected environment, that I could anti-alias the rendering with brute force. So the demo takes 8 samples per pixel and does full raymarching, raytracing, and lighting for every sample. Well it's not 100% brute-force: since the wooden floor texture has the highest-frequency content in the vertical direction the samples are arranged to so that more samples are taken vertically than horizontally. Furthermore the number of octaves is drastically reduced for reflected rays, since no-one will notice the lack of detail there. In the end the number of octaves was 7 for primary rays and 2 for reflected rays.
Lighting
The lighting in this demo is very art-directed. Rays are cast only for direct camera visibility and for mirror reflections (although thanks to the extreme anti-aliasing the high-detail bumpmaps do result in something resembling glossy reflection). There is a sort of analytic ambient occlusion for the walls using a simple attenuation function, some fake bounce light is added for the walls and floor (since they always have the same overall colours) and there is a single shadow cast by the chair from a single spotlight source. The shadow has a varying penumbra, the size of which is based on a very approximate distance from the chair itself (in other words it is not physically simulated at all). So, the lighting calculations in this demo are done with a method which is a complete polar opposite to that used in Horizon Machine!
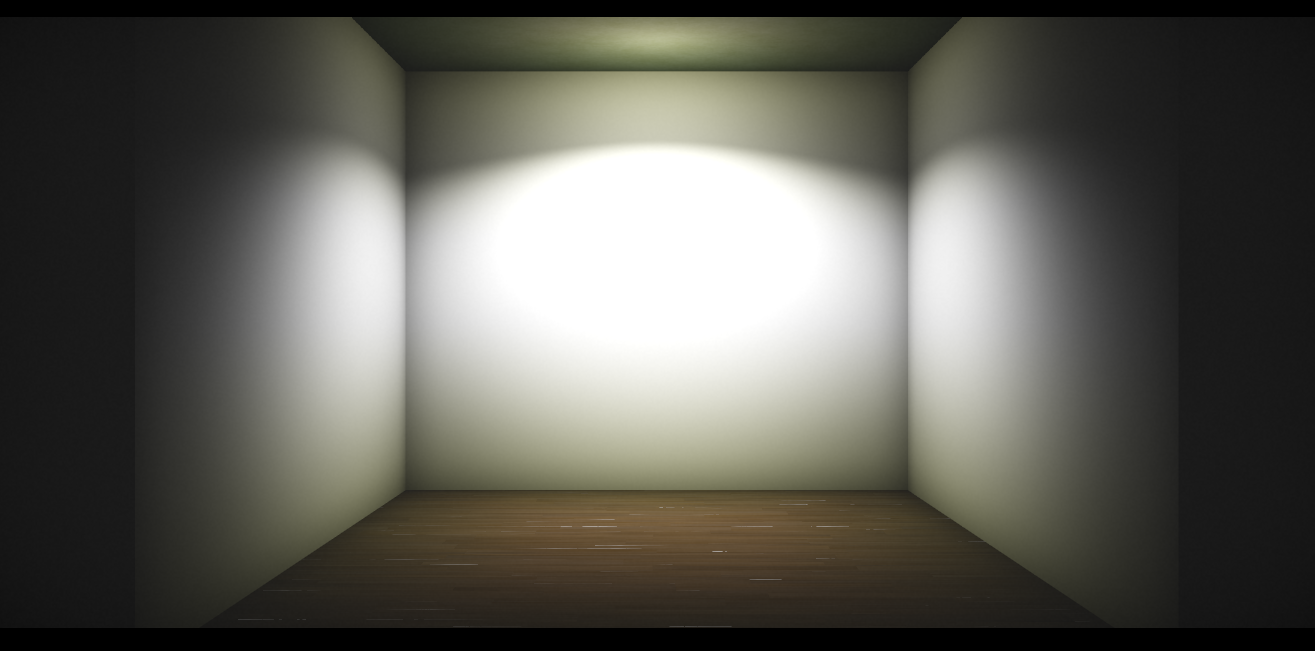
Lighting test. Note the coloured bounce light on the top and bottom edges of the walls.
Depth Of Field
The depth-of-field effect is simple and brute-force. It visits every pixel in a 13x13-pixel neighbourhood around the shading pixel and performs a soft max operation over them, limiting the inclusion of pixels to a circle in order to achieve a circular bokeh effect. To vary the radius of the circle, the pixel offsets are simply scaled by the alpha value read from the framebuffer, which was previously written in the first pass and calculated by distance from some plane of focus. You may wonder where the radius value is written to if the shader output is always written directly to the framebuffer. Well, it is stowed away in the alpha channel! It's extremely handy in a 4kb demo to be able to do this, since the creation of offscreen framebuffers and extra texture handles can take up a lot of bytes in the executable. The soft max operation produces some asymmetry in the filter kernel, but it's very subtle and bokeh in real-world photographs is often pleasingly non-uniform anyway. It also makes brighter pixels 'bloom out' and around the darker pixels, which looks nice.
for(int y=-6;y<=6;++y)
for(int x=-6;x<=6;++x)
if(x*x+y*y<37)
{
vec2 offset=vec2(x,y)*texelFetch(tex1,ivec2(gl_FragCoord.xy),0).a;
vec4 c=max(gl_FragColor,texelFetch(tex1,ivec2(gl_FragCoord.xy+offset),0))
gl_FragColor=mix(gl_FragColor,c,.06);
}
An early fire and depth-of-field test, using average (left), minimum (middle), and maximum (right) blending operation.